
Over two years ago, Apache Beam introduced the portability framework which allowed pipelines to be written in other languages than Java, e.g. Python and Go. Here’s how to get started writing Python pipelines in Beam.
1. Creating a virtual environment
Let’s first create a virtual environment for our pipelines. Note that we want to use Python 3 because Python 2 is now obsolete and won’t be supported in future Beam releases.
> virtualenv --python=python3 venv
> source venv/bin/activate
Now let’s install the latest version of Apache Beam:
> pip install apache_beam2. Writing a Beam Python pipeline
Next, let’s create a file called wordcount.py and write a simple Beam Python pipeline. I recommend using PyCharm or IntelliJ with the PyCharm plugin, but for now a simple text editor will also do the job:
import apache_beam as beam
import apache_beam.transforms.window as window
from apache_beam.options.pipeline_options import PipelineOptions

def run_pipeline():
  # Load pipeline options from the script's arguments
  options = PipelineOptions()
  # Create a pipeline and run it after leaving the 'with' block
  with beam.Pipeline(options=options) as p:
    # Wrap in paranthesis to avoid Python indention issues
    (p
     # Load some dummy data, this can be replaced with a proper source later on
     | 'Create words' >> beam.Create('to be or not to be')
     # Split the words into one element per word
     | 'Split words' >> beam.FlatMap(lambda words: words.split(' ')
     # We are assigning a count of 1 to every word (very relevant if we had more data)
     | 'Pair with 1' >> beam.Map(lambda word: (word, 1))
     # We are interested in 10 second periods of words
     | 'Window of 10 seconds' >> beam.WindowInto(window.FixedWindows(10))
     # Group all the values (counts) of each unique word
     | 'Group by key' >> beam.GroupByKey()
     # Sum the counts for each word and return the result
     | 'Sum word counts' >> beam.Map(lambda kv: (kv[0], sum(kv[1])))
     # Just print to the console for testing
     | 'Print to console' >> beam.Map(lambda wordcount: print(wordcount))
    )

if __name__ == '__main__':
  run_pipeline()
Please see the inline comments for an explanation of what the code does.
We can now run the pipeline:
> python wordcount.py
('to', 2)
('be', 2)
('or', 1)
('not', 1)
Arguably, that’s a very simple pipeline but you get the gist. Later on, we will change the data source to read from Kafka.
3. Choosing a Runner
By default, the so called DirectRunner runs your pipeline. The DirectRunner is only intended for local development purposes. It’s very slow and does not support distributed execution.
Let’s run the same pipeline with the Flink Runner which will runs the pipeline (you guessed it) on top of Apache Flink:
> python wordcount.py --runner=FlinkRunnerWhat happens when you run your script with the --runner argument? Beam will look up the Runner (FlinkRunner) and attempt to run the pipeline. By default, this will download the Flink Runner JAR which contains the Beam JobService. The JobService will receive the pipeline and submit the pipeline to a Flink cluster. If you do not specify a cluster address via --flink_master, a local Flink cluster will be started.
Fore more information visit the Flink Runner page. The page also contains information on other Runners, such as Google Cloud Dataflow or Apache Spark.
4. Configuring the environment
By default, the Python code will run in a so called LOOPBACK environment. That’s an environment intended for development and testing purposes. It’s called LOOPBACK because a local Python process is started which runs the Python code. However, if you submit to a cluster, the environment will default to DOCKER which will bring up Docker containers on each of the hosts.
If you want to test the Docker-based execution locally, you can specify the following:
> python wordcount.py --runner=FlinkRunner --environment_type=DOCKERThe Beam community publishes Docker images for all releases which are used by default. You can build / specify a custom image.
See the environment documentation page for more information on environment configuration.
5. Cross-language pipelines
As a next step, let’s read some data using Beam’s KafkaIO. Oh no! Turns out, there is no native Kafka connector in the Python API. No problem, we can use KafkaIO in from the Java SDK:
import apache_beam as beam
import apache_beam.transforms.window as window
from apache_beam.options.pipeline_options import PipelineOptions
from apache_beam.io.external.kafka import ReadFromKafka, WriteToKafka

def run_pipeline():
  with beam.Pipeline(options=PipelineOptions()) as p:
    (p
     | 'Read from Kafka' >> ReadFromKafka(consumer_config={'bootstrap.servers': kafka_bootstrap,
                                                           'auto.offset.reset': 'latest'},
                                          topics=['demo'])
     | 'Par with 1' >> beam.Map(lambda word: (word, 1))
     | 'Window of 10 seconds' >> beam.WindowInto(window.FixedWindows(10))
     | 'Group by key' >> beam.GroupByKey()
     | 'Sum word counts' >> beam.Map(lambda kv: (kv[0], sum(kv[1])))
     | 'Write to Kafka' >> WriteToKafka(producer_config={'bootstrap.servers': kafka_bootstrap},
                                        topic='demo-output'))
    )

if __name__ == '__main__':
  run_pipeline()
The essential pipeline logic hasn’t changed, but we have swapped out the simple Create / Print transforms for reading / writing to / from Kafka. Note that these transforms are not native Python transforms but so called external transforms. External transforms are placeholders which get replaced by the actual transform when the pipeline is built.
To understand what will happen when we run this pipeline, have a look at this image:
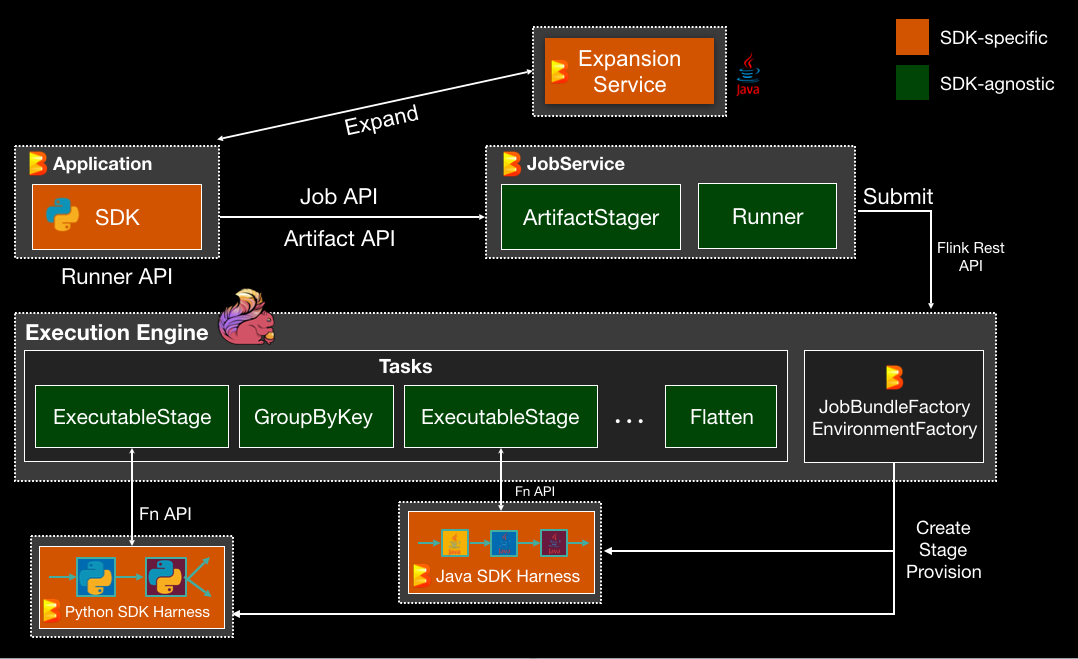
When we run the Python script, the pipeline is constructed. During this, a lookup to the ExpansionService is performed to resolve ReadFromKafka / WriteToKafka. Once the pipeline has been assembled, it is submitted to the JobService which also receives any required artifacts (e.g. Python libraries). The Runner then submits the pipeline against a Flink cluster.
Native transforms like GroupByKey can be processed directly by Flink. Any language-specific code runs in a separate environment for the language. The environment contains the SDK Harness which is responsible for running the language-specific code.
The good news is that you normally do not have to worry about this process. FlinkRunner, as part of the Python SDK, abstracts away a lot of the complexity.
6. Reach out to the Beam community
That’s it! For more information, check out the Beam documentation. Still stuck? Feel free to reach out to the Beam community.